 Muser Studio
 📦 Muser Studio v1.0.32:
M-Vave MIDI Controlled Camera App


Release Notes
Features:
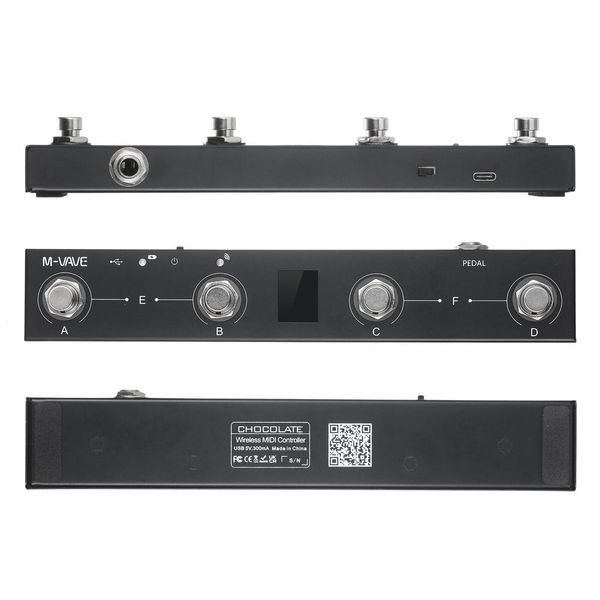
- More control via your MIDI controller. Tap, tap-hold, double tap, double tap-hold on the A button (CC-20) gives you click toggle, reset tempo, record start/stop and new project.
- Toggle camera availability to save you from cycling through unwanted cameras when doing camera switching within recordings.
Bug fixes:
- Background app (via power button screen lock, or draw-bar swipe-up) and return to foreground resilience for camera management and audio/video exports.
ℹ️ MIDI Controlled camera app for making video loops
So with two buttons you can run a whole session, hands free and focus on your instrument. How?
The “A” button handles your session and your click track.
- Tap it to toggle the metronome on or off. That’s your guide click.
- Tap and hold to reset the tempo. The BPM goes back to undefined, so the next loop you record sets it based on its natural timing. This is the one you want when you want to do some free-styling, letting your natural tempo set the pace.
- Double tap to start the recording session, and double tap again to stop it. This is the same start and stop you’d normally do on screen, now under your foot.
- Double tap and hold to bail out. It aborts whatever is happening and starts a fresh project. If you were still recording, that take gets erased. Think of it as the “that one didn’t work out, let’s try again” button. It takes the most effort of any gesture here, on purpose, because it’s the biggest commitment.
- Tap also plays and pauses your video edit, once you’ve made one. Same gesture, and which one you get depends on where you are: the click toggle while you’re in a session, playback when there’s an edit to watch.
The “B” button works while a session is recording, and it manages your loops.
- Tap to mark the start of a loop. Tap again to mark the end. If a loop is already in progress you’ll see a red ring, and that second tap closes it out.
- Tap and hold to mute or unmute the last loop you defined. Handy for dropping a layer that didn’t work, or just playing with whether it should be on or off.
That’s the whole control surface. Two buttons, your hands free, and the loop building itself while you play.
You might be wondering why I didn’t use the other two buttons. And you’d be right to wonder ;). Please support the project by following the socials, or even better subscribing to the app too. If you’ve got this far I think you’ll enjoy the things I’ve got planned.!
🎛️ Why MIDI?
MIDI controllers aren’t new to Muser Studio. They’ve actually worked for a while. What’s changed is how much you can now do with them, and that came out of a lot of playing.
Firstly, why a MIDI controller at all?
You can already go hands-free with a Bluetooth page turner, letting you start and stop recordings and mark your loop points with a foot tap. Page turners work by pretending to be a Bluetooth keyboard. This gets the basics done but leaves no room for more expressive gestures like press-and-hold. You get the basic button presses, and that’s about it.
A MIDI foot controller is a different story. The timing is more reliable, so loop points represent your intent more accurately. The real magic is in the fact that each button can be set to have a down and up value (see this blog post for set up info on the M-VAVE Chocolate). This separate down and up signal makes it possible to allow you to do more things depending on how you press a button. Oh and let’s not forget the nice news of that tends to surprise people: a MIDI controller costs about the same as a page turner - *now.
Creating a new control scheme didn’t come from some spec sheet. I sat down and made a stack of guitar and cello recordings, exploring and noting what I expected in the moment. The resulting setup in this new release is directly from what I consistently found myself reaching for.
One ethos runs through all of it: the more effort a gesture takes, the bigger the commitment behind it. A single tap is for things you do all the time. A double tap and hold is for less common, serious moves, like throwing out a session and starting over. The friction matches the stakes, so you don’t fire off something drastic by accident
📷 🔄 🤏 Tighter camera cycling
I found that cycling through camera during a recording took me through the telephoto lens which I actually rarely use for close up instrument playing shots. That gave me the idea to want to toggle camera availability. This is how you do it!
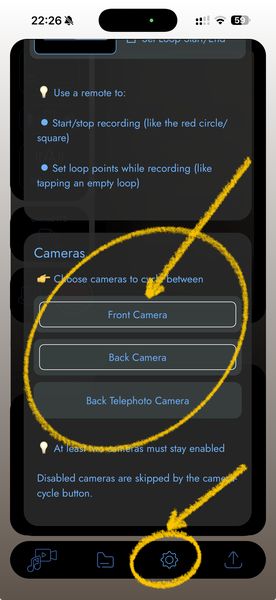
Head to the Settings tab, scroll down to the Cameras section. By default all available cameras should be already one. Tap to toggle off the ones you don’t want to cycle through.
Some closing thoughts
If you’ve got thoughts on what would make using Muser Studio easier and more fun, I would love to know about it. Feel free to reach out!
*MIDI Foot controllers used to be in the hundreds of pounds/dollars a few years ago. Thankfully you can pick them up for less than $20/£20 these days.
v1.0.32 is available now for iOS
GIF credit: Giphy
No comments yet - be the first!