 Muser Studio
 How to Annotate Images
Annotation Station runs in your browser. No account, upload, or install. The tool is at splintersilk.com/tools/annotation-station.
What this post covers
So you know, this is the long version. If you just want to know what the thing is and get a first image marked up, the short introduction is a better start - it gets you to a labelled screenshot and stops.
Here we will go through every tool and control, and the parts that are not obvious from looking at them. It is meant to be dipped into rather than read start to finish, so each section is stand alone.
Get your images in
- A) click Add images and pick them
- B) drag them onto the page from Finder
- C) on Desktop hit Open folder and point it at the folder they live in.
Three routes: (A) Add images opens a file picker, (B) dragging files onto the page works from Finder or Explorer, and (C) Open folder - desktop Chrome and Edge only - hands the tool a whole folder.
The folder route is worth choosing when you can, because the folder you open is also where exports get written. The other two routes have no folder to write back to, so they fall to a zip download instead. More on that under exporting.
Images can be reordered by dragging them in the left column, and removed with the × on the thumbnail.
The toolbar
Two rows on desktop, three on mobile. The second one is the tool palette: Select, Ellipse, Rectangle, Arrow, Text, Badge, Crop. Whichever is lit is what a drag on the image does. Ellipse is the default.
On desktop (shown) the row continues with Properties on the right, on mobile properties will have their own row. With nothing selected Properties shows the settings that will apply to the next thing you draw. Select an existing annotation and it switches to showing that annotation’s own settings, so changing a value there restyles what you have selected rather than setting a default.
Which Properties appear depends on what is active. Colour and width show for shapes; text size for text; badge size for badges; the corner radius and the fill only for rectangles. A control that would do nothing is not shown.

Drawing shapes
Ellipse, Rectangle and Arrow all draw by dragging. Ellipses and rectangles are drawn corner to corner; an arrow is drawn from its tail to its point, so drag in the direction you want it to point.
Switch to Select to work with what you have drawn. Click a shape to select it, drag it to move it, and drag one of the handles on its corners to resize it. The middle of each edge resizes too, along one direction only: hover there and the pointer turns to a two-headed arrow, and dragging changes just the width or just the height. An arrow gets handles on its two ends instead. Delete removes the selected annotation, as does the Delete button in the property row.
An arrow’s shaft is thin, so it is given a wider invisible band to click on than it appears to have - you do not have to hit the line exactly.
Circles, squares and straight arrows
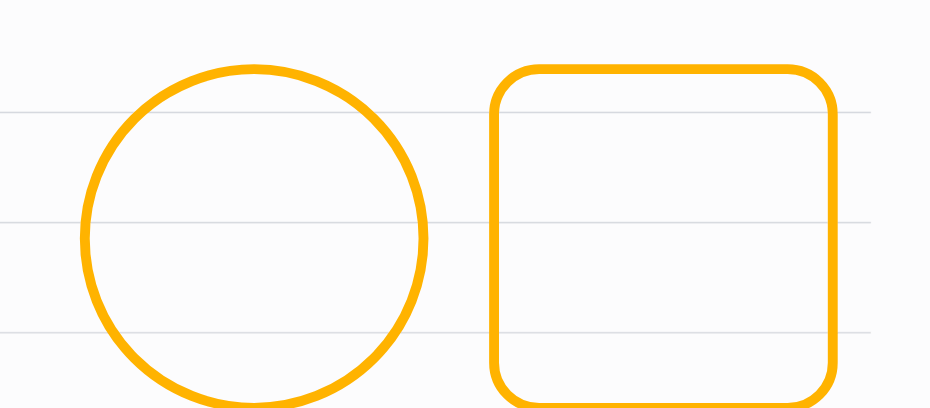
Hold Shift while drawing or resizing to constrain: an ellipse becomes a circle, a rectangle becomes a square, and an arrow snaps to the nearest 45 degrees.
Hold Shift while moving something and it keeps to one direction: it follows whichever direction you first moved it, across or up and down, and ignores any drift in the other. Let go of Shift and it moves freely again.
There is no Shift key on a phone, so the property row carries a 1:1 toggle that does the same thing and stays on until you turn it off. The two are exclusive-or rather than cumulative: with the toggle on, holding Shift releases the constraint.

Rounded corners
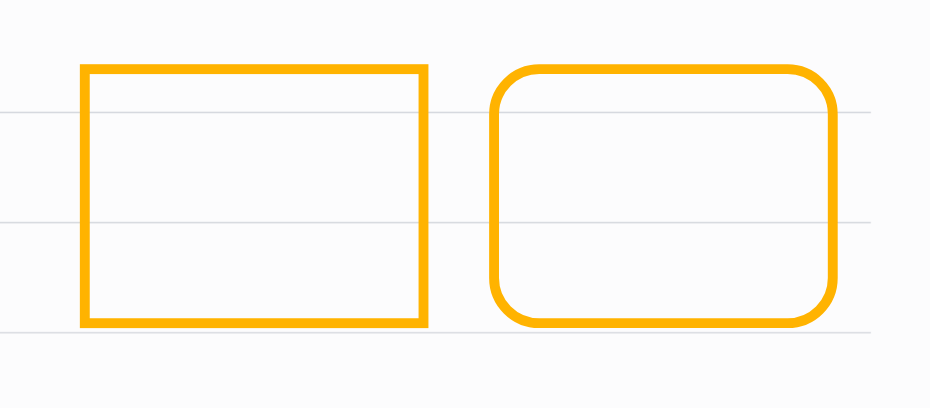
Rectangles have a Corner control, in image pixels. The default is 32, which reads as clearly rounded at the default line width without turning a small rectangle into a lozenge. Set it to 0 and you get sharp mitred corners back.
It is an absolute value rather than a proportion, deliberately: a fixed radius makes a group of rectangles on one image look like a set, the way a corner radius works in a design system. A proportional one would give every rectangle a different curvature. The radius is capped at half the shorter side, so it can never exceed the shape.
Filled and blurred regions are the same rectangle with a different paint, so they round the same way.
Numbered badges
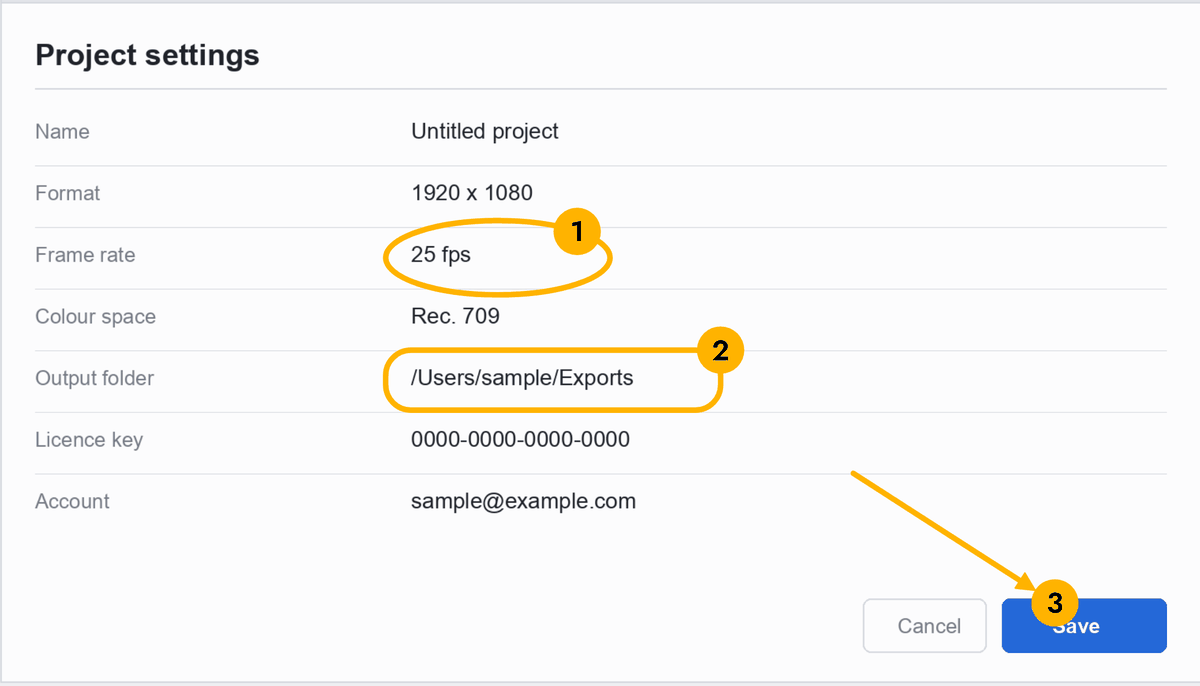
A badge is the little numbered disc that sits on a shape’s corner. Two ways to add one: pick the Badge tool and click a shape, or right-click the shape and choose Add badge.
They count themselves. The first badge on an image is 1, the next 2, and so on - the series is per image, so every image starts again at 1. The toggle in the property row switches the whole series to letters instead, and offers to convert badges you have already placed.
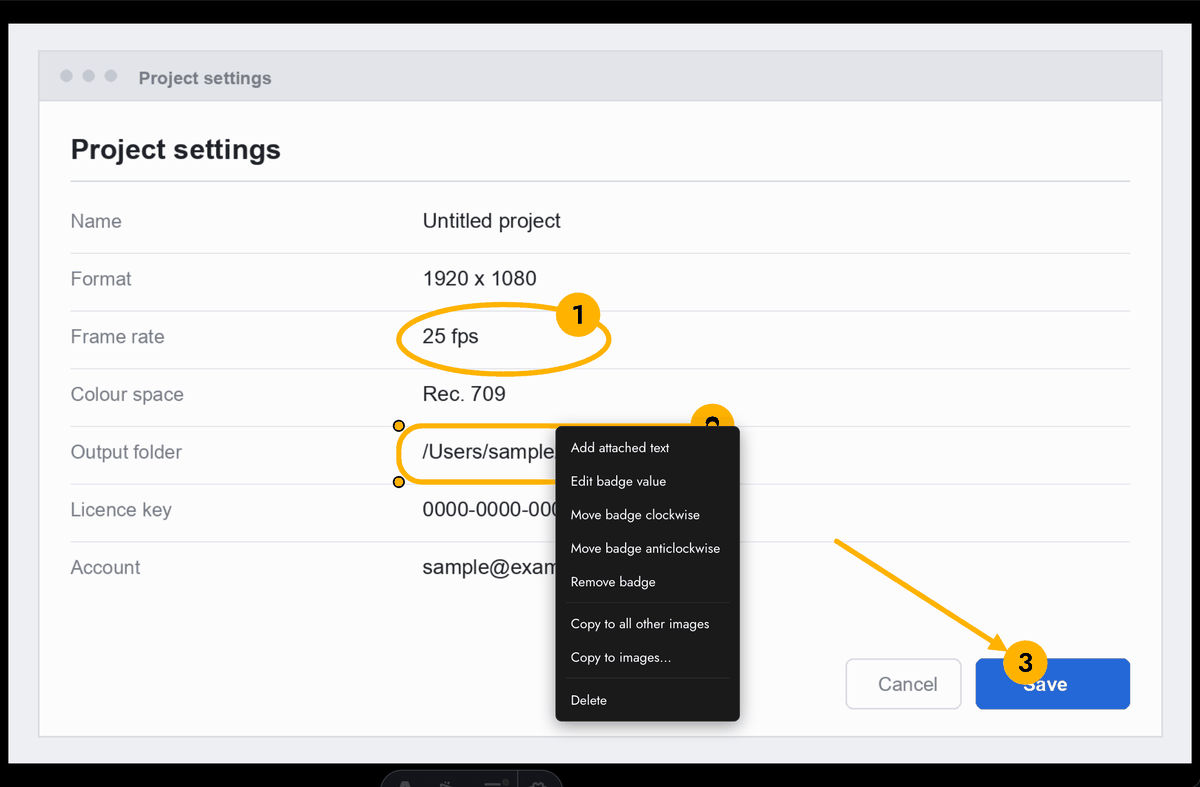
Where the badge lands depends on where you pressed. Press in the top-left quadrant of a shape and it goes to the top-left corner. Afterwards you can drag the badge itself to another corner, or use Move badge clockwise and Move badge anticlockwise from the right-click menu.
An arrow has ends rather than corners, so its badge sits at the tail or the point, and its menu item names the end it is not currently on - Move badge to head or Move badge to tail. Clockwise means nothing on a line.
Edit badge value lets you override the number, and Remove badge takes it off without removing the shape.
Text labels
Two kinds, and the difference matters.
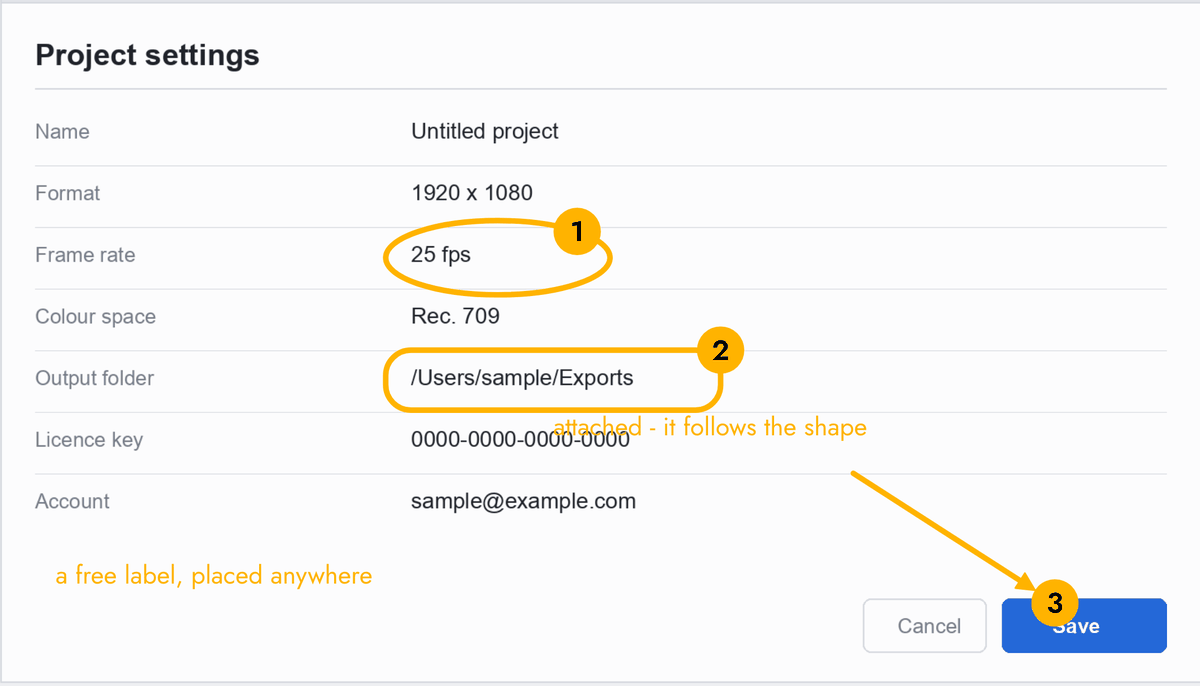
A free label is placed with the Text tool - click where you want it and type. It sits where you put it and stays there.
An attached label is added by right-clicking a shape and choosing Add attached text. It is anchored to that shape, so moving or resizing the shape takes the label with it, and deleting the shape deletes the label. This is the one you want for a caption that belongs to a specific mark.
Double-clicking with the Select tool active also works: on empty space it starts a free label, on an existing label it opens it for editing, and on a badge it edits the badge value. Note the “with Select active” part - with a drawing tool active, a double click is just two draws.
Text size is set in the property row while the Text tool is active, in image pixels like everything else.
Colour, width and size
Five colour swatches plus a full colour picker, a Width for line thickness, Text size, Badge size, and Corner for rectangles. All the size values are in image pixels, not screen pixels, so they mean the same thing whatever zoom you are viewing at.
The defaults are sized for full-resolution photographs - a 25 pixel line, 32 pixel text. On a small image they will look enormous, and you should turn them down; on a 12-megapixel photo they are about right.
Change one of these with nothing selected and it becomes the default for whatever you draw next. It also offers to apply the change to what you have already drawn, with two buttons: This image or All images. Ignore the offer and it goes away on its own, having changed nothing retrospectively.

Hiding things you do not want to publish
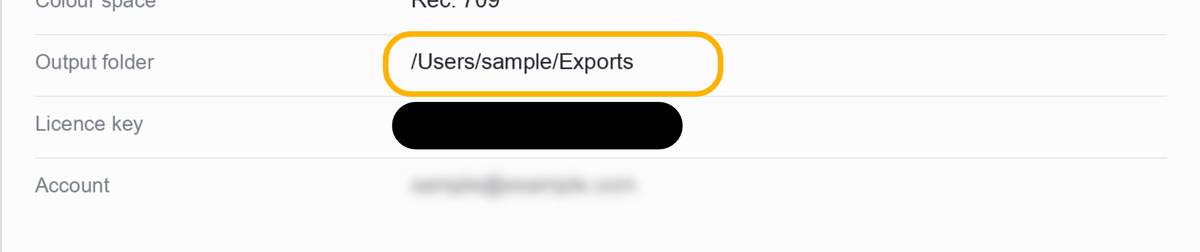
With the Rectangle tool active the property row offers three fills: Outline, Fill and Blur.
Outline is the ordinary rectangle - a border, no fill.
Fill is a solid panel in the current colour. Pick the black swatch, the last one in the row, and it is a redaction bar. Any other colour gives you a block to cover a busy background or sit a label on.
Blur softens the region past reading. Its strength is derived from the size of the region rather than set by you, because a fixed radius is useless on a large area and destroys a small one. Roughly, the blur scales with the shorter side of the rectangle.
The important part: both are applied when the image is exported, to the exported pixels. They are not an overlay sitting on top of an intact image, so what was underneath is genuinely not in the output file.
Blur regions and filled panels are painted underneath the ordinary marks, so an arrow drawn over a filled area stays visible, and dropping a panel over an existing mark does not swallow it.

Copying work across images
This is the part that saves the most time on a set of similar screenshots, and it comes at two scopes.
One annotation. Right-click it and choose Copy to all other images, or Copy to images… to pick which. The same controls are in the property row when something is selected, which is how you reach them on a touch screen.
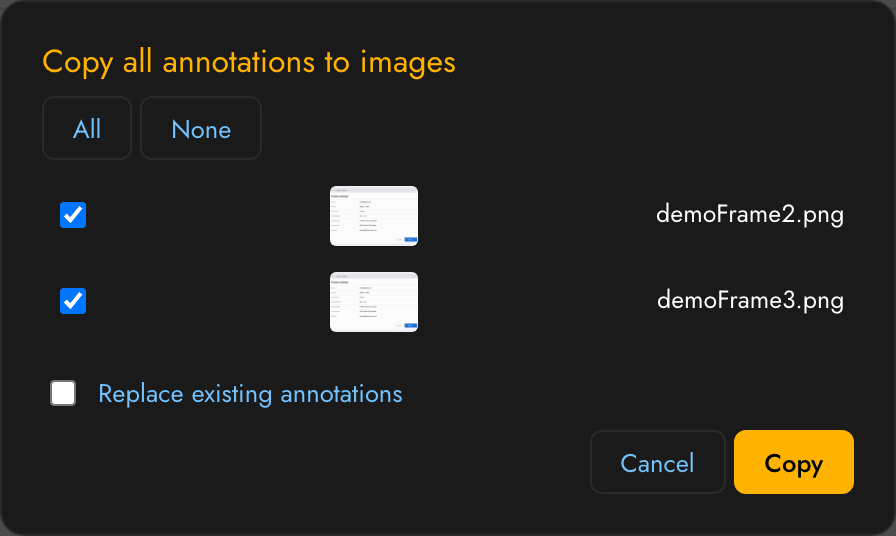
Every annotation on the image. Right-click on empty canvas - not on a mark - and choose Copy all annotations to…. That opens a picker listing every image in column order, with the one you are on greyed out so you can see where you are, and none ticked. Tick the ones to copy to, or press All. An image you have named shows its new name.
The picker carries one more control: Replace existing annotations, unchecked. Left alone, the copies are added to whatever the target images already have. Tick it and the targets are cleared first. It is off by default because merging is recoverable and replacing is not.
Copies are independent once made - editing one does not change the others. Where two images are the same size the coordinates are copied straight across; where they differ, positions are scaled proportionally.
Cropping
Pick Crop and drag the region you want to keep. Everything outside dims. The crop is free-form - there are no ratio presets.
The thing worth knowing is that a crop is not applied until export. Your annotations stay in the full image’s coordinates the whole time, so changing or clearing a crop never moves them, and a mark that falls partly outside the crop is simply cut off at the output edge like anything else.
The property row in crop mode carries Clear to remove the crop on the current image, and Copy to all / Copy to… to push the same crop onto others.

Undoing
Cmd+Z on a Mac, Ctrl+Z on Windows. Redo is Cmd+Shift+Z or Ctrl+Y. There are undo and redo buttons in the top row of the toolbar as well.
It covers annotation edits - drawing, moving, resizing, restyling, deleting, propagation, crop changes. Inside a text field the browser’s own undo takes over, which is what you want while typing.
Naming and exporting
Each image in the left column has a name box under its thumbnail. Type a name and that is what the output is called; leave it and the output is <original>_edited, so an export never overwrites the file you started from.
To name a run of images in one go, highlight them in the left column first. Shift-click highlights a range, Cmd-click (Ctrl-click on Windows) adds or drops one, and Cmd+A (Ctrl+A) with the column clicked highlights the lot. Then right-click one of them and choose Rename multiple….
Type a pattern with {%02d} where the number goes: holiday_{%02d} names them holiday_01, holiday_02 and so on, counted in column order. {%d} gives the number with no padding. The dialog previews every name before you commit, and if any two images would end up writing the same file, the rename is cancelled and you are told which.
Export current writes the image you are on. Export all writes every loaded image.
Where they go depends on the browser. If you opened a folder, the outputs are written back into that folder. Otherwise you get a single zip download containing the lot.
Output format follows the source: a JPEG in, a JPEG out. PNG, JPEG and WebP are preserved; anything else, including GIF, comes out as PNG. JPEG and WebP are encoded at quality 0.92.
Saving your work, and using it on a phone
Your annotations are held in the browser, keyed to the set of filenames you loaded, and restored when you come back and re-pick the same images. A browser cannot silently reopen files from your disk, so re-picking is unavoidable - but the marks come back when you do.
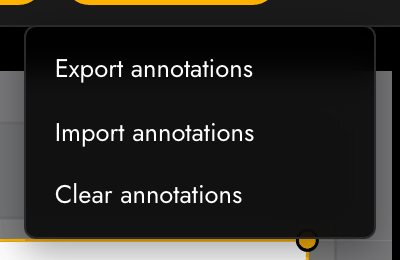
The … menu at the top right holds Save annotations… and Open annotations…, also on Cmd+S and Cmd+O. They write and read a small .splas file, an Annotation Station project: every image in the column, in order, with its marks, crop and output name. That is the one to use if you want the work to survive a cleared browser, move to another machine, or sit in the folder next to the images.
Saving offers to put the file alongside the highlighted image, and that box is ticked by default. In desktop Chrome and Edge the save dialog then opens in that image’s folder, or, if you used Open folder, the file is written straight into it. Other browsers download it instead.
Open one from the menu, or drag the .splas file onto the page. Opening a project puts its images back in the column in the saved order, with everything applied. A browser will not read a folder without asking, so you are asked to choose the folder that holds them. In Chrome and Edge the picker opens where the project file is, so that is usually one click. Elsewhere you pick the images themselves and they are sorted into the saved order. Anything missing is named, and .json files saved by older versions still open.
Clear annotations discards the current set.
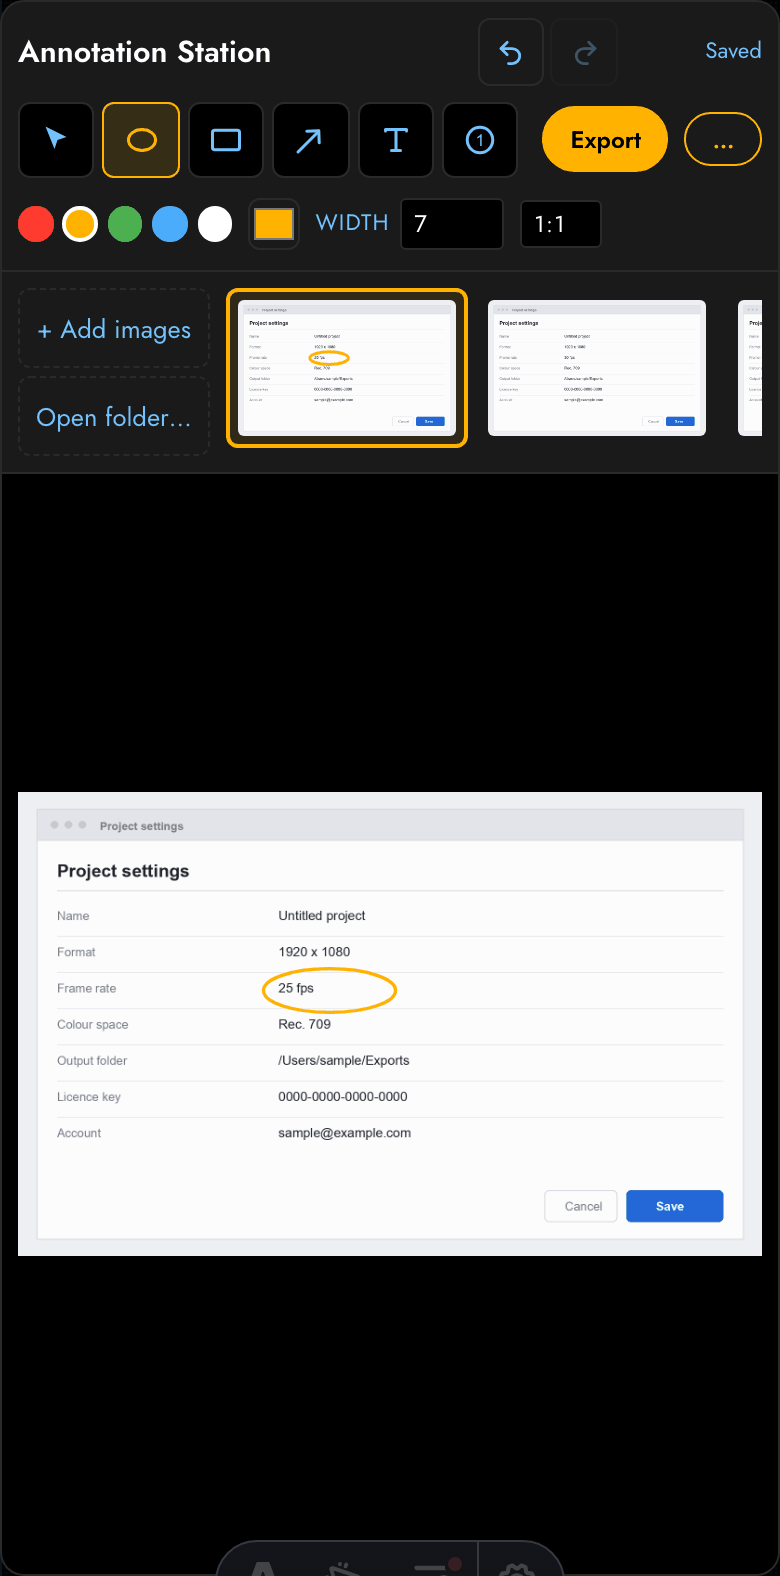
On a phone the whole thing works by touch. Draw with a finger, pinch to zoom and pan around the image, and long-press an image in the filmstrip to reach its name and its per-image actions. The toolbar scrolls horizontally rather than wrapping, so it stays one row deep at any width.
That’s it! If something here does not match what you are seeing, it’s probably because the tool has evolved since I wrote this. Tell me and I will fix it.
Photo credit: Dillon Wanner - A Person Drawing On A Piece Of Paper
No comments yet - be the first!